This post walks through how to enable private, cross-account, cross-region access to an S3 bucket without any traffic leaving the AWS network. The scenario: an application in us-west-2 (Account B) needs to read from an S3 bucket in us-east-1 (Account A). The data is sensitive, so public endpoints and internet-routed proxies are off the table.
The solution uses a hub-and-spoke Transit Gateway architecture, cross-region TGW peering, and a VPC Interface Endpoint for S3.
The Scenario
- Account B — application workload in
us-west-2, needs read access to a bucket in Account A. - Account A — owns the S3 bucket in
us-east-1. - Hub Account — owns and shares the Transit Gateways for both regions.
All traffic must stay on the AWS private network. No public S3 endpoints. No NAT. No internet.
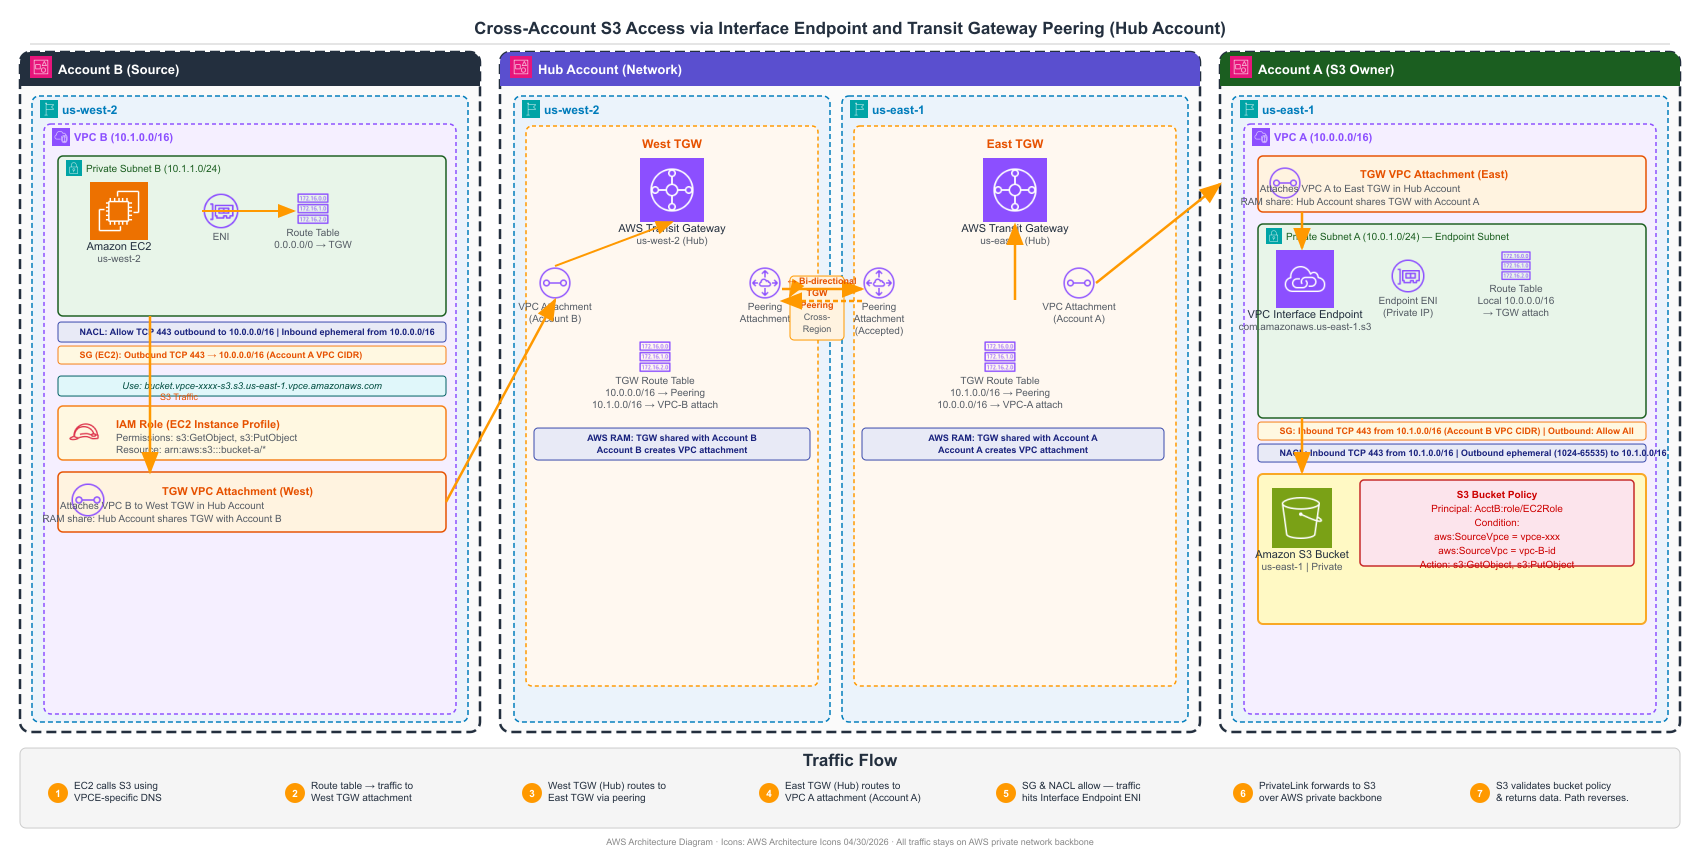
Cross-account, cross-region S3 access via Hub TGW peering and VPC Interface Endpoint
Prerequisites
Before following these steps, make sure the following are already in place:
- A Hub Account with a Transit Gateway in
us-west-2(West TGW) and a Transit Gateway inus-east-1(East TGW). - Both TGWs are shared with Account B and Account A via AWS Resource Access Manager (RAM).
- Account B has created a VPC attachment to the West TGW.
- Account A has created a VPC attachment to the East TGW.
- The West TGW and East TGW are peered across regions (peering attachment created and accepted).
Step 1 — Establish Bidirectional Routing on Both TGWs
In the Hub Account, update the TGW route tables so traffic can flow in both directions.
West TGW route table
| Destination | Target |
|---|---|
Account A VPC CIDR (e.g. 10.0.0.0/16) | Peering attachment → East TGW |
East TGW route table
| Destination | Target |
|---|---|
Account B VPC CIDR (e.g. 10.1.0.0/16) | Peering attachment → West TGW |
Both route tables also need their local VPC attachment routes so traffic can reach the VPC at each end.
Step 2 — Create the S3 Interface Endpoint in Account A
In Account A (us-east-1), create a VPC Interface Endpoint for S3:
- Service name:
com.amazonaws.us-east-1.s3 - VPC: Account A’s VPC
- Subnet: a private subnet in Account A’s VPC
- Private DNS: leave disabled — Account B will use the endpoint-specific DNS hostname directly
Note the endpoint-specific DNS hostname after creation. It will look like:
<bucket-name>.vpce-xxxx-s3.s3.us-east-1.vpce.amazonaws.com
Step 3 — Update the Endpoint Security Group (Account A)
Attach a security group to the interface endpoint with the following rules:
| Direction | Protocol | Port | Source |
|---|---|---|---|
| Inbound | TCP | 443 | Account B VPC CIDR (10.1.0.0/16) |
| Outbound | All | All | 0.0.0.0/0 |
Step 4 — Update Subnet NACLs at Both Ends
Account A — subnet hosting the interface endpoint
| Direction | Protocol | Port | CIDR |
|---|---|---|---|
| Inbound | TCP | 443 | Account B VPC CIDR (10.1.0.0/16) |
| Outbound | TCP | 1024–65535 | Account B VPC CIDR (10.1.0.0/16) |
Account B — subnet hosting the application
| Direction | Protocol | Port | CIDR |
|---|---|---|---|
| Outbound | TCP | 443 | Account A VPC CIDR (10.0.0.0/16) |
| Inbound | TCP | 1024–65535 | Account A VPC CIDR (10.0.0.0/16) |
Step 5 — Update Security Groups at Both Ends
Account B — application security group
| Direction | Protocol | Port | Destination |
|---|---|---|---|
| Outbound | TCP | 443 | Account A VPC CIDR (10.0.0.0/16) |
Account A — endpoint security group (covered in Step 3 above)
Step 6 — Update the S3 Bucket Policy (Account A)
The bucket policy must explicitly allow Account B’s IAM principal and scope it to the VPC endpoint:
{
  "Version": "2012-10-17",
  "Statement": [
    {
      "Effect": "Allow",
      "Principal": {
        "AWS": "arn:aws:iam::<AccountB-ID>:role/<EC2RoleName>"
      },
      "Action": ["s3:GetObject", "s3:PutObject"],
      "Resource": "arn:aws:s3:::<bucket-name>/*",
      "Condition": {
        "StringEquals": {
          "aws:SourceVpce": "vpce-xxxx",
          "aws:SourceVpc": "<AccountB-VPC-ID>"
        }
      }
    }
  ]
}
Step 7 — Configure the Application in Account B
Configure the application or AWS SDK in Account B to use the endpoint-specific DNS hostname from Step 2:
<bucket-name>.vpce-xxxx-s3.s3.us-east-1.vpce.amazonaws.com
This hostname is publicly resolvable via standard DNS and returns the private IP addresses of the endpoint ENIs in Account A’s VPC. No Route 53 Resolver rules or Private Hosted Zone sharing is needed.
How the Traffic Flows
Once everything is in place, a request from Account B to the S3 bucket travels as follows:
Account B (us-west-2)
- Application sends request to the endpoint-specific DNS hostname, which resolves to the endpoint ENI private IPs.
- Traffic hits the TGW VPC Attachment (West) in Account B’s VPC.
Hub Account 3. West TGW receives the traffic and routes it via the peering attachment to the East TGW. 4. East TGW routes traffic to the TGW VPC Attachment (East) pointing to Account A’s VPC.
Account A (us-east-1) 5. Traffic arrives at the S3 Interface Endpoint ENI, passes security group and NACL checks, and is forwarded to S3 over PrivateLink.
The response travels the same path in reverse.
Summary
| Component | Account | Action |
|---|---|---|
| TGW route tables (bidirectional) | Hub | Add routes for both VPC CIDRs |
| S3 Interface Endpoint | Account A | Create in private subnet |
| Endpoint security group | Account A | Allow inbound TCP 443 from Account B CIDR |
| Subnet NACL | Account A & B | Allow TCP 443 + ephemeral ports |
| Application security group | Account B | Allow outbound TCP 443 to Account A CIDR |
| S3 bucket policy | Account A | Allow Account B principal + VPC endpoint condition |
| Application config | Account B | Use endpoint-specific DNS hostname |
This pattern scales well. Once the TGW peering and RAM sharing are in place, enabling private cross-account access for additional services is mostly a matter of repeating Steps 2–7 for each new endpoint.